Shampoo bars are a solid alternative to liquid shampoo.
One bar is equivalent to 60–80 washes, around the same as what you’ll get from three medium bottles of shampoo. Not only are homemade shampoo bars compact, travel-friendly, affordable to make and free from packaging, but they’re also a great way to take control of what goes into your shampoo.
With a homemade shampoo bar, you can be certain that there are no unwanted chemicals or ingredients in your haircare product, including sulphates, which can be unnecessarily harsh on the scalp and cause irritation.
We sell the ingredients like emulsifying wax that you’ll need to make your own shampoo bars at home.
In this blog, we’ll cover the entire process of how to make a shampoo bar, from creating the base to the final formation.
The Benefits of Shampoo Bars
Initially, people might be sceptical about using a solid shampoo for fear that the product won’t lather up or work as effectively as a liquid.
However, shampoo bars are unique in that they help to remove surface grease, debris and skin secretions from your scalp, all without stripping your hair of any natural oils. For many people, using a shampoo bar helps to control the amount of product used, as most people have no idea how much shampoo to use in one sitting. The likelihood is that you’re using too much, as your liquid bottle makes it far too easy to squeeze more product onto your hands or directly onto your scalp than you need.
The result is a drying effect that we then must work to reverse with other products, like conditioner or hair masks. At the very least, we’ll simply waste shampoo by having excess fall onto the floor of your bath or shower. Shampoo bars, on the other hand, do lather up but also give you the time to assess just how much shampoo your hair needs.
While shampoos work to cleanse your scalp and hair, they can quickly do too much by removing the natural sebum that your sebaceous glands produce.
Sebum is an oily substance that the 2 million sebaceous glands in our bodies produce. It benefits the hair by protecting the skin and hydrating it. To optimise this process, we brush our hair to disperse this natural substance throughout the lengths and ends, leaving it feeling supple and soft.
When shampooing your hair, it’s crucial to protect this natural process and retain the sebum oil that your body has worked so hard to produce.
Shampoo bars are quickly becoming a popular product because of this.
Making Your Shampoo Base
There are plenty of ingredients you can add to your shampoo bar to tailor it to your needs, but the most important part of the process is creating the shampoo base, which will allow your shampoo to properly cleanse your scalp as well as hold its solid formation.
To create a trusty base, you’ll need to meld several ingredients together, using either a double boiler or a bain-marie.
We recommend the following ingredients and ratios:
- 22% Beta T
- 9% Emulsifying Wax
- 5% Tomato Seed Oil
- 3% Cetearyl Alcohol
- 50% SCI Solid Surfactant*
*SCI Solid Surfactant will need to be ground to a powder-like consistency. You can use a coffee grinder to achieve this. For protection, you should always wear a mask and be cautious of not breathing in any SCI dust, as it may cause irritation.
All five ingredients serve a purpose in creating a stable shampoo base.
For example, SCI Solid Surfactant is a common ingredient used in shaving cream, for its ability to foam and provide a creamy texture with dense bubbles. This allows your shampoo to lather up, even if it’s in the form of a solid bar.
Similarly, Beta T plays an important role in your shampoo base. It’s a mild cleansing agent that will effectively clean your hair without stripping it or leaving it feeling straw-like. We recommend using Beta T in all homemade hair shampoos, due to its gentle formula, which is suitable for babies as well as adults.
Cetearyl Alcohol is a form of co-emulsifier that adds a thick, luxurious texture to any lotion. Only a small amount of Cetearyl Alcohol is needed, as you’ll also be adding emulsifying wax. Using an emulsifier creates a smooth, stable formula and effectively helps bind opposing ingredients together.
Although you can use other animal-based emulsifiers, we recommend using an emulsifying wax, which is vegan. As well as boasting a squeaky-clean ethical status, vegan emulsifiers are far less likely to cause a nasty reaction or give off a distinct, fatty fragrance.
To finish the shampoo base, you should add a small amount of tomato seed oil. Tomato seed oil is the perfect addition, promoting healthy, radiant hair, but you can switch out this ingredient for any other vegetable oil suitable for hair use.
When mixing these ingredients, you’ll want to make sure that they’re well combined while taking care that the SCI Solid Surfactant doesn’t melt completely.
How to Form Shampoo Bars
After creating your shampoo base, you’ll want to add the final touches to your mixture.
Immediately add:
This combination will add a slightly herbal aroma and help to reduce dandruff and split ends. However, if you’re making shampoo bars for the entire family, you should remove the Comfrey Glycerol Extract, as this ingredient is not suitable for children or pregnant women.
Activated charcoal powder is added to act as a secondary, “deep” cleanser that unclogs pores and cleanses impurities. This ingredient, in particular, is known for its apparent ability to aid hair growth.
Before forming the shampoo bar – usually when the mixture is under 40° – you’ll want to add any heat-sensitive ingredients such as essential oils that are tailored to your hair type. We have a standard recommendation in our Detoxifying Syndet Shampoo Bar recipe, which includes the addition of Lemon Essential Oil, Tea Tree Essential Oil and Rosemary Verbenone Essential Oil.
Whichever extras you add, make sure they take you to a 100% total, in accordance with the other ratios expressed in this blog post.
When you’ve finished adding every ingredient, it’s time to form the shampoo bar, using a mould. For this, you can use a standard soap mould in any shape, but we recommend using a slim rectangular soap mould for ease of use. Ideally, you’ll want a shape that will sit in the palm of your hand and allow you to control the application with even greater precision.
Leave your mixture in the moulds and in a refrigerator until they set. You’ll need to wait at least a couple of hours before your mixture will start forming into a solid, so make these bars ahead of time to tie in with your hair-wash schedule. After setting, they should be left to harden outside of the mould, in a dry place and away from direct sunlight.
What to Add for Dry or Damaged Hair
If your hair is particularly dry, damaged or colour-treated, you may want to pay careful attention to which additional essential oils you use.
Almond oil and shea butter oil are both popular for adding more moisture to your shampoo bar. The addition of grapefruit essential oil helps to treat oily scalps, but in this case, it could also help prevent your shampoo bar from being too greasy, by balancing the effects of any cleansing agent.
At this stage, you’re free to play around with oil combinations to find one that works for you, based on where you are at in your haircare journey. Provided you’ve built a solid shampoo base, you’ll be able to tweak this part of the recipe to suit you.
Of course, each essential oil carries its own fragrance, so consider your personal preferences and experiment with oils to find a scent you love.
Some people may add dried botanicals to enhance the smell of their shampoo, such as lemon zest. Beware, though, that using fresh zest or herbs will cause invisible mould, so always revert to dried variations if you’re going down this route.
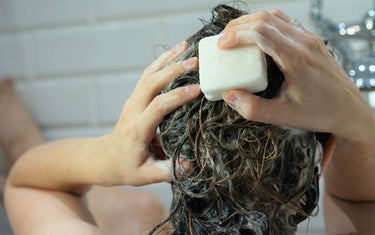
How to Use Shampoo Bars
As its name suggests, a shampoo bar is shampoo in bar form. This means using them doesn’t cause a major disruption to your haircare routine.
To lather up the bar, you’ll want to run its surface under warm water and rub the product between your hands, as you would a bar of soap.
It won’t take long for your shampoo bar to produce a lather, thanks to the SCI Solid Surfactant, which means it’s ready for application. You can take both the residue and the bar and apply them directly to the scalp. Smooth the bar over the surface of your head while paying attention to cover both the base and hairline before rinsing off the lather with warm water.
As with any other shampoo, you may want to repeat this process to perform a double cleanse — all depending on your hair type. When doing this, you’ll notice that your shampoo will lather up much more efficiently the second time, as the initial layer of dirt and residue will have been removed.
If you’ve used activated charcoal powder in your shampoo bar, you may not need to go in for a secondary cleanse. Remember, less is more when cleansing your hair, to create a balance between the removal of debris and the retention of sebum.
When using shampoo bars for the very first time, you might experience an initial adjustment period where your hair or scalp will feel clogged, waxy or even greasy. Not all individuals will experience this, depending on the condition of their hair and the products they’ve previously used. If you do, stick with your new routine and your hair will adjust after subsequent washes.
If you have particularly damaged hair and have used shampoo with sulphates for an extended period, you’re likely to produce more dirt and grease when switching to natural shampoo. This is because sulphates often strip surface oil and create a layer of product over the hair follicles. It might feel like you’re cleaning your hair when using this type of product, but in reality, you’re simply creating a build-up of sulphates on your scalp.
Needless to say, the first few washes with sulphate-free shampoo or a shampoo bar will start to break down this build-up.
At most, it’ll take only a few weeks to transition to using shampoo bars, at which point it’ll become your new and favourite shower staple.
Take control of your haircare routine. Shop our emulsifying wax and all the products mentioned in this guide at our online store.